 For a couple of releases now you have been able to use the very common scripting language python to script applications that are considered Workbench native: the project page, Engineering Data, DesignXplorer, and the Parameter Manager. This is pretty cool and something that we will cover in a future The Focus article. But one thing that most people don’t know is that python also works well with Microsoft Excel. So if it works with Excel and Workbench, you should be able to use it to connect the two.
Now before you get too excited, realize that ANSYS Mechanical, CFX, FLUENT, CFX Post and most other solvers and post processors that launch from Workbench are not workbench native applications, so they don’t speak python. So no, this is not a replacement for PADL or CCL. They are called “data integrated” applications in that they share data through the Workbench interface, but they have their own software structure that is unique, and their own scripting language.
So to take advantage of this python commonality you have to connect to one of the native applications, and the parameter manager makes the most sense. And fortunately the kind technical people at ANSYS, Inc. have provided a great example in the help system to do just that. And in doing so they have cut the length of this article in half.
ANSYS Documentation Example
You can find the example under: Workbench // Scripting Guide // Using Scripting in ANSYS Workbench // Usage Examples // Updating a Workbench Project and Parameters from Excel. It is a very simple example, a cantilever beam, but it shows the basics and is a great place to start.
Read the manual page completely, especially the notes at the bottom. They point out the key things you need to know. The files you need are in the documentation, but you need to dig up the excel/workbench files and copy the python script and get rid of the line numbers. I’ve put them all together in a zip file to make things easier:
There are a few things worth discussing on this example before we move on to something more complicated.
How to Run It
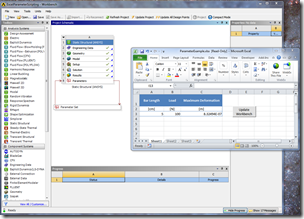
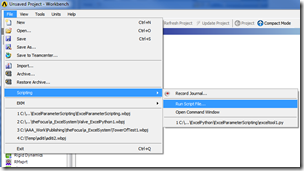
One thing the example leaves out is the details on how to run it. To start, you need to copy all the files to one directory: the python script, the workbench database, the workbench files, the excel file. Then (it does point this out) you need to set the working directory variable in the script to the directory with all the files. Now it is time to run. To do this open up Workbench with a new project (or File->New if you already have Workbench open). Now run the script with File->Scripting->Run Script File…
This will launch Excel and Workbench and add the command to execute the update script when you push the button. So, what next? Change the value for Bar Length or Load and press the button. This should cause Workbench to update and the Maximum Deformation value to change to Updating… and then the new value when the run is done. And that, in a nutshell, is the basics of making the two tools talk.
How it Works
The documentation does a pretty good job of explaining the details. The important take away is that you have to do a couple of key steps in any program that is going to do this sort of thing:
- Tell python to load the Excel stuff
- Set up the working directory, the routines all need absolute paths to work
- Grab cell’s from excel, grab params from Workbench, and set one to the other as needed
- Do an update
- Provide a mechanism to start the process (the button in this case)
If you have these steps, you can make Excel and ANSYS talk.
Where Things Run
An important thing to get your head around is where the script is running, or more accurately, what process is reading and executing the script. The python interpreter is actually in the Workbench environment. When you run the python script you are not running it in Excel or in the operating system. It is running through a interpreter inside Workbench.
This is important because it controls what information is automatically available to the script as well as how you launch it. In this example, you launch from Workbench and it starts up Excel, does stuff in Excel, and then assigns a python routine to the button. When the button is clicked, you are still running a python script in Workbench – it is just talking to Excel.
Limitations in the Example
There are two big limitations with this example when it comes to using it on a real problem. First, it is not general enough because you have to hard code in file names, directory locations, cell locations and strings. This is not a huge deal because if you are going to use an excel based simulation tool over and over, you only have to set it up once and go.
The other problem is that the action to update the spreadsheet and model is assigned as an OLEObject to the button. Unfortunately this is only active when the script is running. Once it is done the click action is removed, and the button becomes useless… allowing for only one use of the button. This is a significant issue.
A More General and Complex (Sort Of) Example
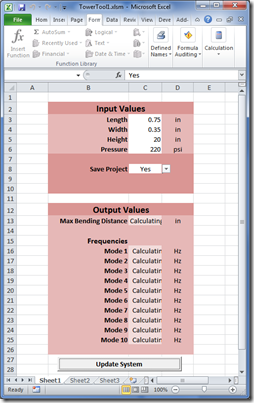
A common potential usage for this sort of tool would be to provide a user with an Excel based tool that they would use to design a part and see the results. For this example we are going to use a very complicated tool for designing towers with a rectangular cross section. The input variables are the length, width, and height of the tower as well as a pressure applied to one face. The output variables are the deflection from the pressure and the first 10 natural frequencies.
Of course a real example would have more complex input and output values, and the spreadsheet would probably do a lot more calculations, perhaps even optimization.
This example avoids the button problem by actually running Workbench from Excel by launching it from the command console and supplying the project file AND the python script as startup parameters to Workbench. Workbench loads the project, runs the script, then exits.
The Spreadsheet
The spreadsheet is called TowerTool1 and it is a macro (xlsm) spreadsheet. You can download it here:
The sheet is not that different from the ANSYS provided example. It has cells for input and output parameters. It also has a button to update the system. The first thing that is different is that it uses named ranges for the input and output cells. To see the names go to Formulas->Defined Names->Name Manager. I used “Create from Selection” to automatically assign the text in Column B to the values in Column C an D for each row.
Also note the units. Because Workbench parameters (with the exception of Design Modeler parameters) are unit sensitive, you can specify the units in those columns and use them to do unit conversion as needed. In this example only the units on the Pressure are implemented to show how this is done.
There is also a little Drop Down Yes/No choice for the user to decide if they want to save the project file or not when they are done running.
The button is also different from the ANSYS example. Instead of being assigned an action by the python script, it executes a very simple Visual Basic routine:
Private Sub CommandButton1_Click()
retval = Shell(“C:\Program Files\Ansys Inc\V130\Framework\bin\win64\runwb2 \
-X -R updateWB2.py -F ExcelTower1.wbpj”, vbNormalFocus)
End Sub
The line uses the Shell function to execute a system level command in Windows. The command it runs is the command line way to start Workbench.
The –X says run interactive and exit when any given command line options are completed.
The –R gives a python script to be run, and this is our python script that is presented in detail below.
The –F specifies that project file to be executed. As an aside, you could make this program more general by having a cell in the spreadsheet hold that file name and then substituting that value in the execution string.
The ANSYS Model
This extremely complex model can be found in the following archived project file:
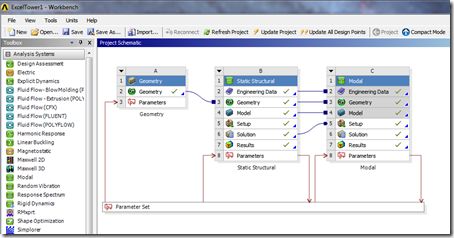
The model contains a DesignModeler solid, a static structural solution, and a modal analysis. The key aspect of the model are the parameters.
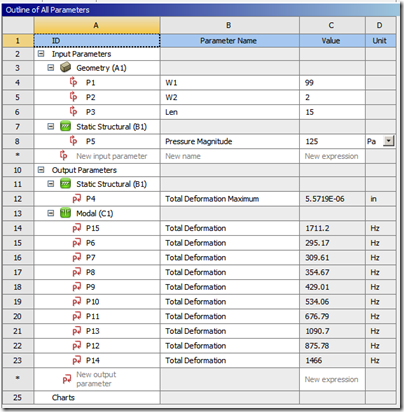
The outline for the parameter manager looks like this:
The various parameters were set up in each system in the normal way, by clicking on the parameter box next to them for each value you want to supply or return. The key thing to note here are the Names (P1-P15) for the parameters, because this is what our python script will use to change or retrieve values before and after the model update.
The Script
The actual script we are using is shown below. Comments have been added to describe important steps. You can download it, without the line numbers, here:
Please don’t laugh too hard. I ran out of time to convert the code into something more concise using do loops and variables. The whole thing could be made much more general if you know python better than I do.
1: # IronPython imports to enable Excel interop,
2: import clr
3: clr.AddReference("Microsoft.Office.Interop.Excel")
4: import Microsoft.Office.Interop.Excel as Excel
5: from System.Runtime.InteropServices import Marshal
6:
7: # import system things needed below
8: from System.IO import Directory, Path
9: from System import DateTime
10:
11: # use the ANSYS function GetProjectDirectory to figure out what directory you are in
12: # and set that to the current directory
13: projDir = GetProjectDirectory()
14: Directory.SetCurrentDirectory(projDir)
15:
16: # Open up a log file to put useful information in
17: logFile = open("TowerTool.log","w")
18:
19: # Put a header in the log file
20: logFile.write("================================================\n")
21: logFile.write("Tower Tool Run Log File\n")
22: logFile.write("================================================\n")
23: logFile.write("Start time: " + DateTime.Now.ToString('yyyy-mm-dd hh:mm:ss') + "\n")
24: logFile.write("Proj Dir: %s\n\n" % projDir)
25:
26:
27: # Use the Excel GetActiveObject funtion to get the object for the excel session
28: ex = Marshal.GetActiveObject("Excel.Application")
29: # Make Excel visible
30: ex.Visible = True
31: # Define the active workbook and worksheet
32: wb = ex.ActiveWorkbook
33: ws = wb.ActiveSheet
34:
35: # In Excel: Grab values for the cells that we want data from (input cells)
36: length = ws.Range["Length"](1,1).Value2
37: width = ws.Range["Width"](1,1).Value2
38: height = ws.Range["Height"](1,1).Value2
39: press = ws.Range["Pressure"](1,1).Value2
40: upress = ws.Range["Pressure"](1,2).Value2
41:
42: # In Excel: See if the user wants to save the project after the update
43: saveit = ws.Range["Save_Project"](1,1).Value2
44:
45: # In Workbench: Grab the parameter objects for the input values
46: lenParam = Parameters.GetParameter(Name="P1")
47: widParam = Parameters.GetParameter(Name="P2")
48: hgtParam = Parameters.GetParameter(Name="P3")
49: prsParam = Parameters.GetParameter(Name="P5")
50:
51: # In Workbench: Get the object for the deflection parameter vlue
52: defParam = Parameters.GetParameter(Name="P4")
53:
54: #In Workbench: Set the value of the input parameters in Workbench using the values
55: # we got from Excel
56: lenParam.Expression = length.ToString()
57: widParam.Expression = width.ToString()
58: hgtParam.Expression = height.ToString()
59: prsParam.Expression = press.ToString() + " [" + upress + "]"
60:
61: # Set the output values to "Calculating..." since they no longer match the input values
62: ws.Range["Max_Bending_Distance"](1,1).Value2 = "Calculating..."
63: ws.Range["Mode_1"](1,1).Value2 = "Calculating..."
64: ws.Range["Mode_2"](1,1).Value2 = "Calculating..."
65: ws.Range["Mode_3"](1,1).Value2 = "Calculating..."
66: ws.Range["Mode_4"](1,1).Value2 = "Calculating..."
67: ws.Range["Mode_5"](1,1).Value2 = "Calculating..."
68: ws.Range["Mode_6"](1,1).Value2 = "Calculating..."
69: ws.Range["Mode_7"](1,1).Value2 = "Calculating..."
70: ws.Range["Mode_8"](1,1).Value2 = "Calculating..."
71: ws.Range["Mode_9"](1,1).Value2 = "Calculating..."
72: ws.Range["Mode_10"](1,1).Value2 = "Calculating..."
73:
74: # Now let Workbench go to town and update the systems using the new parameter values
75: logFile.write("Updating Project\n")
76: Update()
77:
78: # If asked for, save the project
79:
80: if saveit == "Yes":
81: logFile.write("Saving Project\n")
82: Save()
83:
84: # Assign the value of the Excel deflection cell output deflection from Workbench
85: ws.Range["Max_Bending_Distance"](1,1).Value2 = defParam.Value.Value
86:
87: # Now go through the value of each natural frequency in Workbench and
88: # set the corresponding cell in Excel
89: # This could be made more general or at least more concise by using a do loop
90: # Also note that instead of getting the objects, then the values the two steps are
91: # combined for these values
92: ws.Range["Mode_1"](1,1).Value2 = Parameters.GetParameter(Name="P6").Value.Value
93: ws.Range["Mode_2"](1,1).Value2 = Parameters.GetParameter(Name="P7").Value.Value
94: ws.Range["Mode_3"](1,1).Value2 = Parameters.GetParameter(Name="P8").Value.Value
95: ws.Range["Mode_4"](1,1).Value2 = Parameters.GetParameter(Name="P9").Value.Value
96: ws.Range["Mode_5"](1,1).Value2 = Parameters.GetParameter(Name="P10").Value.Value
97: ws.Range["Mode_6"](1,1).Value2 = Parameters.GetParameter(Name="P11").Value.Value
98: ws.Range["Mode_7"](1,1).Value2 = Parameters.GetParameter(Name="P12").Value.Value
99: ws.Range["Mode_8"](1,1).Value2 = Parameters.GetParameter(Name="P13").Value.Value
100: ws.Range["Mode_9"](1,1).Value2 = Parameters.GetParameter(Name="P14").Value.Value
101: ws.Range["Mode_10"](1,1).Value2 = Parameters.GetParameter(Name="P15").Value.Value
102:
103: # Done! Close the log file and move on
104: logFile.write("End time: " + DateTime.Now.ToString('yyyy-mm-dd hh:mm:ss') + "\n")
105: logFile.close()
Execution
Execution is pretty simple. When the user pushes the Update system button the program goes off and launches Workbench with the script as input. The script changes the parameters, updates the model, saves if asked for, updates the values in the spreadsheet, then Workbench exits.
One key thing to know is the issue with working directories. The Excel file needs to be in the same directory as the script and the project. Sometimes Excel changes the working directory (say you opened a different spreadsheet). If you get an error on execution that Workbench can’t find the project file, you just need to go back to Excel and do a Save As in of your file on top of itself. That fixes the problem. More advanced users can use VBA to control directories.
Resources
The first resource for doing this type of work is the ANSYS Workbench->Scripting Guide in the online help.
ANSYS uses a flavor of python called IronPython. They have a great web site at:
Specific info on the connection to Excel can be found at: http://www.ironpython.info/index.php/Interacting_with_Excel
Thoughts and Suggestions
Both examples presented are pretty simple, but they have the core of what you need to drive Workbench from Excel. It really is not that hard to do and can provide a nice interface for users who don’t know Workbench.
Some areas for improvement and suggestions for a real application are:
- Use jScript in Workbench to add a button that runs a script that attaches to an open Excel file and update based on the current values in that Excel file. So instead of running Workbench in batch from Excel, pressing the button would update everything. That seems to be a more effective way to do it. (maybe a quick article in the future if Matt help me figure out how to add a button quickly…)
- Do more with VBA or Python in the Excel file to make you Excel based tool more sophisticated.
- There is no error checking in this example… very bad. For a real world tool a lot more code should be added to check things and to capture errors from various functions.
- As one can imagine, this can be extended to other programs. A good example would be an optimization tool or another “calculating” tool like MathCAD or Matlab.

