I was futzing around with some loads the other day and noticed that, to my shock, that if you click on the value for a load and instead of typing a value in, click on the drop down menu and you will find that it has an Import and an Export on it. I’m not sure when that became a capability, but I think it has been there for a while. A quick check with the staff here at PADT and only a few knew about it. Which makes it a great topic for The Focus.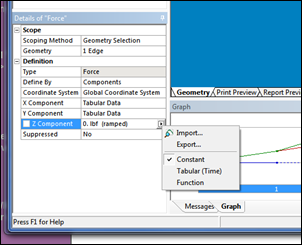
XML, Engineering Data, and Verbosity
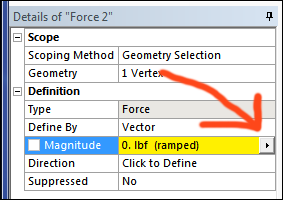
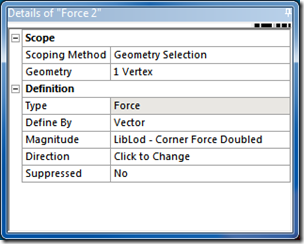
The easiest way to check this out is to go into a model and insert a force into your model. Go ahead and pick the geometry. In the Details for the force, click on the magnitude cell and you will see a little drop-down menu triangle:
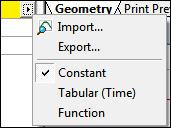
Click on that and you will see the menu:
Click on Export and give it a file name. You will notice when you do this that it makes an XML file. If you didn’t know it, ANSYS Mechanical uses a lot of XML. In fact, they used to even store results in an XML file. The good thing about XML files is that they kind of self-describe themselves and organize the data in them in a sort of object oriented way. This makes them very easy to read and portable between programs.
XML stands for eXtensible Markup Language and it is an expansion of HTML to handle data. Check out the Wikipedia article on the topic to learn more. XML is hear to stay and if you don’t get it, you might struggle with some advanced stuff in a lot of areas, not just ANSYS.
The down side of XML is that it is very wordy – verbose. It has lots of text in there that specifies relationships, names, ID’s, etc… Tags out the wazoo. For those of us that grew up feeding our simulation programs fixed format or comma delimited files where the first line specified all the constants and the rest was the data, this can be a bit annoying. But it does make the data portable and “human readable”
Let’s take a look at the XML file from applying a load of 0.0 lbf to our model. The best way to view an XML file is to doubleclick on it. Your browser will bring it up and show what is inside. If you have Dreamweaver or some other HTML editor, that will work even better.
Here is our example:
   1: <?xml version="1.0" encoding="UTF-8" standalone="no" ?>
   1.5: <ANSYS_EnggData>
2: <MaterialData/>
3: <ConvectionData/>
4: <LoadVariationData>
5: <MatML_Doc>
6: <LoadVariation>
7: <BulkDetails>
8: <Name>Force 2</Name>
9: <Form>
10: <Description/>
11: </Form>
12: <PropertyData property="pr1">
13: <Data format="float">0.,0.</Data>
14: <Qualifier>Force</Qualifier>
  15:                               <ParameterValue format="float" parameter="pa1">
                                         0.,1.</ParameterValue>
16: </PropertyData>
17: </BulkDetails>
18: <Metadata>
19: <ParameterDetails id="pa1">
20: <Name>Time</Name>
21: </ParameterDetails>
22: <PropertyDetails id="pr1">
23: <Name>Force</Name>
24: </PropertyDetails>
25: </Metadata>
26: </LoadVariation>
27: </MatML_Doc>
28: </LoadVariationData>
29: <BeamSectionData/>
30: </ANSYS_EnggData>
The first thing you will notice is that the second tag (right after the XML version info) is <ANSYS_EnggData>. That is because ANSYS already had a nice well defined format for putting tabular data into Workbench applications: EngineeringData. So they just used the same format for loads.
The next thing you will notice is a lot of text to specify two value at two time points. A lot of the data is just blank. There in case you need it. To understand this let’s step back and look at tags in HTML.
A tag goes around some piece of information and describes what that information is. Usually you have a starting tag which is the string with a less-than sign at the start and a greater-than sign at the back:
<tagString>
You then put in your information. It could be data, text, more tags, whatever you want. then when you are done, you close out the tag with the same string, but this time start with less-than followed by a forward slash. You still end with greater than:
</tagString>
You can nest these guys, with tags inside tags. This is how you get your object parent-child relationships.
So let’s look at our first couple of lines again, repeated here with the meat taken out (<…>) so we don’t have to scroll back and forth:
1: <?xml version="1.0" encoding="UTF-8" standalone="no" ?><ANSYS_EnggData>
2: <MaterialData/>
3: <ConvectionData/>
4: <LoadVariationData>
5: <MatML_Doc>
6: <LoadVariation>
7: <BulkDetails>
8: <...>
9: </BulkDetails>
10: <Metadata>
11: <...>
12: </Metadata>
13: </LoadVariation>
14: </MatML_Doc>
15: </LoadVariationData>
16: <BeamSectionData/>
17: </ANSYS_EnggData>
You will notice that a lot of the tags in our example end with a forward slash:
<tagString/>
This is an empty tag. It tells the program I got no data of this type. It does save some text compared to other market languages where you just have a blank start and end tag.
So, our example starts and ends with <ANSYS_EnggData> and </ANSYS_EnggData> Everything between in engineering data. Then it says no material data and no convection data. It does say it has load variation data. We then find the LoadVariationData tag. This is what we actually have in the file. It then goes one step down and has a MatML_Doc tag. This tells the program the format of the data being given is in the MatML schema. more on that below.
Then we break the load into two parts: The BulkDetails where the actual data values are specified and the MetaData, which tells the program information it needs to know about the data. Then everything has its end tag, you tell the program you don’t have BeamSectionData, and you finish up.
If you want to, you can not include all the empty tags. the <tagString/> tags. Mechanical reads the file just fine without them. But you can’t get rid of anything else.
The MatML Language
MatML is “an extensible markup language (XML) developed especially for the interchange of materials information.” You can read all about it at: http://www.matml.org/ History, examples, news, etc… It is all there. Like most standards, you can waste a lot of time saying what is good or bad about it. But in the end, what matters is that everyone uses the same standard. (Of course, MatWeb doesn’t support this standard because they want you to pay for native format… grumble, grumble…).
Looking at the Data and MetaData
Let’s look at the heart of our file, the actual data we want. In MatML they call it BulkDetails:
1: <BulkDetails>
2: <Name>Force 2</Name>
3: <PropertyData property="pr1">
4: <Data format="float">0.,0.</Data>
5: <Qualifier>Force</Qualifier>
6: <ParameterValue format="float" parameter="pa1">0.,1.</ParameterValue>
7: </PropertyData>
8: </BulkDetails>
The first thing we find is the name. This is not the name that will be used in the tree. It is the name that will show up in the library if you combine a bunch of XML files and the name that will show up in your detail view for magnitude. So if you make your own load, give it something descriptive here so you can pick it out of the library but not so long that you can’t read it in the detail. Calling it F1 will just tick you off in six months when you try to reuse a load.
Next is the PropertyData tag. It will always have the name “prn” as far as I can tell, where n is an integer starting at 1 and increasing for each property in the file. If you change it, everything gets messed up – so always use pr1.
Now the data. You give it a format, float in most cases, then a comma delimited list. That is it.
Then you tell the program that it is a Force with the Qualifier.
Last, you need to specify the parameters that your load will vary over. Usually this is time. Use <ParameterValue> to do this. Notice how you specify a format and what the parameter is called, and this is always “pa1” (or pan actually, where n starts at 1 and increases for each property in the file).
Now we have to tell the program some additional information about our data, which is called Meta Data. For loads, the only thing that is supported is the definition of the type of load being specified:
1: <Metadata>
2: <ParameterDetails id="pa1">
3: <Name>Time</Name>
4: </ParameterDetails>
5: <PropertyDetails id="pr1">
6: <Name>Force</Name>
7: </PropertyDetails>
8: </Metadata>
Don’t worry too much about this formating stuff. The best thing for you to do is make a load like the one you want in Mechanical, export it to XML, then modify the values inside as you see fit. Much easier than understanding the schema… or even what a schema is.
Units
Please notice that there are no units anywhere. Right now all of your values must be in SI units, and Mechanical will convert when it displays the values. This is because Mechanical always stores values internally as SI. So, if you make your own load files, make sure you convert to SI.
This is the single biggest potential for error… so mind your units!
Importing XML Load Files
The process of reading in the loads is a bit more complicated then simply pointing to a file. This is because each file can hold more than one load. You should think of the XML file as a library.
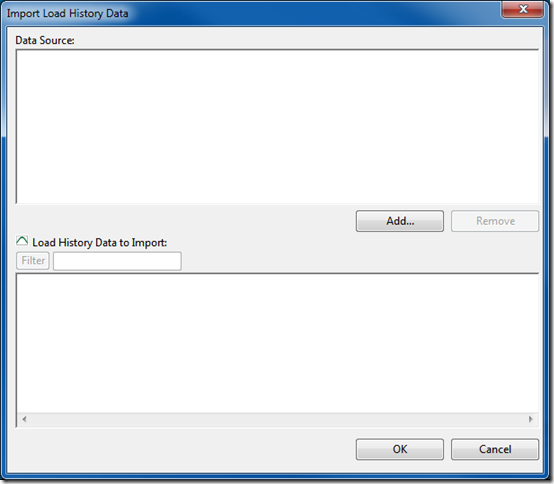
To read the file go to your Magnitude, click on the drop-down menu icon and choose “Import…” This brings up the “Import Load History Data” dialog:
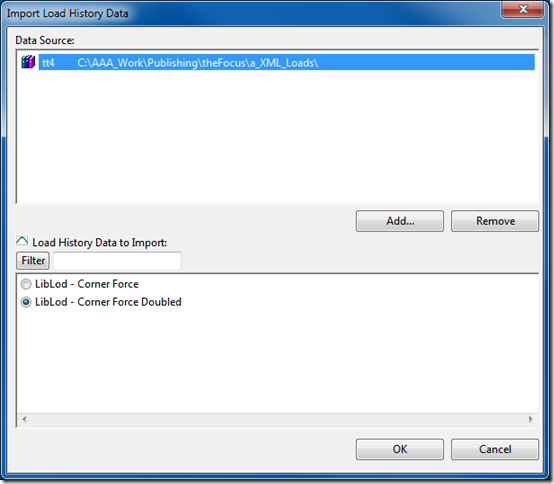
Note that instead of picking a file you are given a Data Source area and a Load History Data to Import area. the top Data Source is the file. Click Add… and point to your XML file. Once it reads that file in it will always remember the file and every time you open this dialog box, it will re-read it and update the Load History data to Import values.
You can see our sample file, tt4.xml, is the library Data Source and within it are two loads. You use the radio button to choose the load you want to apply. Click OK and you will notice that your Details for the load now lists that name as the Magnitude:
As you can imagine, you can put a ton of loads in one file, maybe all the loads for your project. Then use the filter to find the load you want in a big file. This is again a reminder of why it is important to specify a useful name when you create the load.
Formulas
The examples above deal with tabular data. You can also store formulas in the file. This looks a little different in the <BulkDetails> in that you specify format=”function> in the <Data> tag. Here is an example:
1: <MatML_Doc>
2: <LoadVariation>
3: <BulkDetails>
4: <Name>Force 2</Name>
5: <Form>
6: <Description/>
7: </Form>
8: <PropertyData property="pr1">
9: <Data AngleInDegrees="1" AngularVelocityInRPM="1"
10: TemperatureUnit="3" UnitSystem="4" format="function">
11: <Domain LowerLimit="0." UpperLimit="-999.">
12: time
13: </Domain>
14: <Domain LowerLimit="0." UpperLimit="-999.">
15: 1.2*sin(time/6)
16: </Domain>
17: </Data>
18: <Qualifier>Force</Qualifier>
19: <ParameterValue format="float" parameter="pa1">
20: 0.,.1,.2,.3,.4,.5,.6,.7,.8,.9,
21: 1.0,1.1,1.2,1.3,1.4,1.5,1.6,
22: 1.7,1.8,1.9,2.0
23: </ParameterValue>
24: </PropertyData>
25: </BulkDetails>
26: <Metadata>
27: <ParameterDetails id="pa1">
28: <Name>Time</Name>
29: </ParameterDetails>
30: <PropertyDetails id="pr1">
31: <Name>Force</Name>
32: </PropertyDetails>
33: </Metadata>
34: </LoadVariation>
35: MatML_Doc>
A lot more complicated. The best way to make one of these is to do it interactively and export.
Generating XML Load Files
At first blush, the file looks complicated but a simple VBA script in excel or a python macro can build the file very quickly because most of the text is static, you are really just changing the data and parameter value values. I was going to do such an example, but ran out of time. If any of you have one or write one, please let us know so we can share.

