So it is Friday afternoon and that big, involved, deep-dive into some arcane ANSYS capability is still not written. So, time for plan B and the list of not so involved but still somewhat arcane capabilities that we like to expose in The Focus. At the top of that list right now is how to change the results in an ANSYS Mechanical APDL (MAPDL) solve.
One might ask why would you want to do this? Well the most common usage is that you want to use APDL to calculate some result value and then display it in a plot. Similarly, you may want to do some sort of calculation or post processing on MAPDL results but using and external piece of code, but still show the results in ANSYS. Another common usage is to use MAPDL as a post processor for some external solver.
And, it turns out, it is pretty easy. And, as you probably have learned by now if you use MAPDL a lot, there is more than one way to do it.
The “Database”
Before we get into how to do this, we need to talk about the “database” in MAPDL. If you read through the documentation on the commands we will use, it will talk about the database. This is not the jobname.db file. That is the db file. The database refers to the representation of your model, including results and the currently active loads, in memory when you are running MAPDL.
When you do a RESUME command, MAPDL reads the DB file and stores the model, including geometry, mesh, loads, and run parameters, in memory. When you do a SET command, it then adds the results and related information into memory.
So when we use the commands we will talk about next, you are changing what is in the database, not what is in the DB file on your disk. And you are storing it temporarily. Many different commands cause the database to go back to its original values. So you need to be very careful in how you use these tools, and don’t assume that once you have used them, the changes are permanent.
DNSOL
The simplest way to do it is with the DNSOL command: DNSOL, NODE, Item, Comp, V1, V2, V3, V4, V5, V6
So, if you do a dnsol,32,u,x,3.145 the value in memory for deflection in the X direction will be changed to 3.145. dnsol,32,s,x,1.1,2.2,3.3 will change the stress on node 32 in the X direction to 1.1, in the Y direction to 2.2, and in the Z direction to 3.3.
The second argument can also be a component, so you can assign a uniform result value to many nodes at the same time.
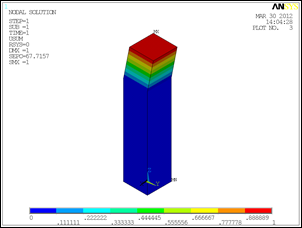
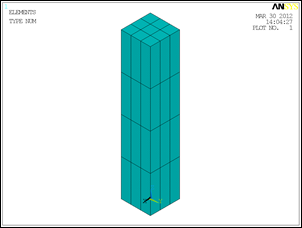
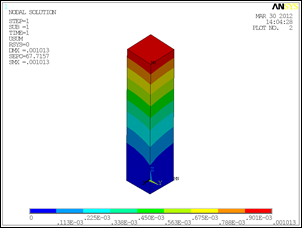
Here is an example, very simple, of a block where we set the deflection on the top nodes to 1 in.
1: finish
2: /clear
3: /prep7
4: blc4,-2,-2,4,4,20
5: et,1,185
6: mptemp,1,70
7: mpdata,ex,1,1,20e6
8: mpdata,nuxy,1,1,.23
9: mpdata,dens,1,1,.001
10:
11: vmesh,all
12: /view,1,1,1,1
13: /vup,1,z
14: /RGB,INDEX,100,100,100, 0
15: /RGB,INDEX, 80, 80, 80,13
16: /RGB,INDEX, 60, 60, 60,14
17: /RGB,INDEX, 0, 0, 0,15
18: /show,png
19: eplot
20:
21: nsel,s,loc,z,0
22: cm,nbt,node
23: d,all,all
24: nsel,s,loc,z,20
25: cm,ntp,node
26: f,all,fx,10
27: f,all,fy,12
28: allsel
29: save
30:
31: /solu
32: solve
33: finish
34: /post1
35: plnsol,u,sum
36:
37: dnsol,ntp,u,y,1
38: plnsol,u,sum
39:
40: /show,close
 Solution with 1” deflection DNSOL’d onto the top nodes
Pretty simple.
NOTE: One key thing to remember is you can not use this with Powergraphics. You must have /graph,full turned on.
*VPUT
The DNSOL is great for a few nodes here and there, or a constant value. But it makes for a big nasty *do loop if you want to do a lot of nodes. So ANSYS, Inc. give us the *VPUT command:
*VPUT, ParR, Entity, ENTNUM, Item1, IT1NUM, Item2, IT2NUM, KLOOP
As you can see, this command has a lot of options, so read the Help before you use it. Most of the time you have an array that stores the value you want stuck on your model in an array (ParR). Then you specify what MAPDL result you want to overwrite and it takes care of it for you.
*vput,nws1(1),node,1,s,1 will place new values for maximum principal stress on all the nodes covered in the array , starting at 1.
Here is an example of the code, after the same solve as above, to do a *vput instead of a DNSOL:
1: finish
2: /post1
3: plnsol,u,sum
4:
5: *get,nmnd,node,,num,max
6: *dim,nwux,,nmnd
7: *do,i,1,nmnd
8: nwux(i) = i
9: *enddo
10:
11: *vput,nwux(1),node,1,u,x
12: plnsol,u,sum
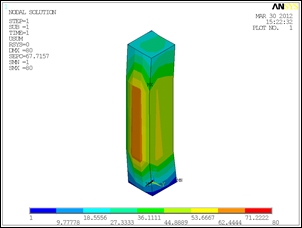
The code places a displacement in the X direction equal to its node number. So node 80 has a UX of 80.
A key thing to note with *vput is that it is much more transient. Pretty much any other command that involves anything other than plotting or listing blows away the values you assigned with *VPUT. So we recommend that you do a *vput before every plot or listing you do.
Thoughts, Questions, and Conclusion
Of course you should never use this to fudge results.
You can get very fancy with this. When I use it I often turn off all the plot controls and then create my own legend. That way I can put hours of life on as temperature or SX and then make my own legend that says LIFE or something of the sort.
Another thing to note is that if you DNSOL or *VPUT a displacement, then ANSYS will distort your plot by that much. That is OK if you are changing deflection, but not so good if you are plotting life or some esoteric stress value.
A common question when you play with these commands is if you can store the modified results in the RST file. You can for degree of freedom results, but not for stresses. You use LCDEF and RAPPND.
And what about ANSYS Mechanical? Well it works totally different, and better. You can do all of this using Design Assessment, which was covered in a webinar and a Focus article you can find here.
The key to using these two commands is pretty much the same as any APDL command: Start on a small test model, write a macro to do it, and keep things simple. And, read the manual. Everything you need to know is in there.


