My mother in law is still getting used to the concept of a smart phone.
MIL: “Do you have a GPS so you know how to get there?”
Me: “There’s an App for that.”
MIL: “Do you have a flashlight?”
Me: “There’s an App for that.”
MIL: “Do you have a chromatic tuner?”
Me: “There’s an app for that.”
OK, maybe my mother-in-law didn’t ask about the tuner, but there is in fact an app for that.
In similar fashion, now that ACT (ANSYS Customization Toolkit) is a reality, we can start answering questions with, “There’s an Extension for that.” What is an extension? It’s a bit of customized software that you can integrate with ANSYS Workbench to have it do things that aren’t built in to the current menus.
We’ll leave the nuts and bolts of how Extensions work for another article, but please be aware that current ANSYS customers can now download several Extensions from the ANSYS Customer Portal. We’ll take a look at one of these in this blog entry.
To access the currently available extensions, you must have a login to the ANSYS Customer Portal and be current on maintenance (TECS). Within the customer portal, the Extensions are available by clicking on Downloads > Extension Library; then click on ACT Library.
As of this writing there are 12 extensions available for download. These vary from the sophisticated Acoustics Extension for 14.5 to simpler extensions such as the one we’ll look at here which allows you to change the material property numbers of entities in Workbench Mechanical.
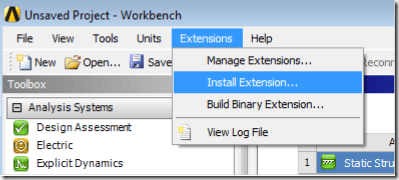
Once you have downloaded the desired extension, you’ll need to install it. For use in the current project, you click on Extensions at the menu near the top of the Workbench Window and click on Install Extension.
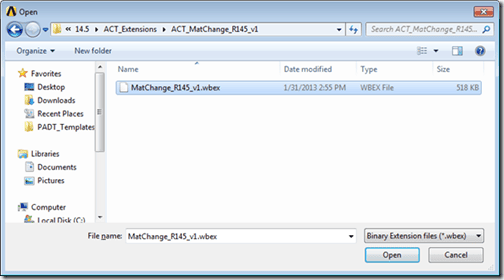
After clicking on Install Extension, you browse to the folder in which you have saved the downloaded extension. The Extension file extension (I’m not making this up) is .wbex. Here is what it looks like when loading the material change extension:
Click Open.
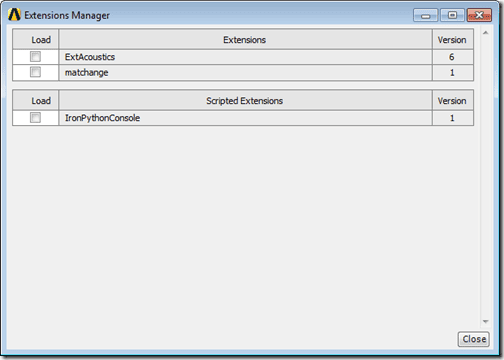
Next you must click on Extensions again the Workbench window, and click on Manage Extensions. That will bring up this window.
Check the box next to any extensions you want to load, then click Close. If you have already launched the Mechanical editor, you will probably need to exit Workbench and get back in or at least click on File > New and reload for the new extension to show up.
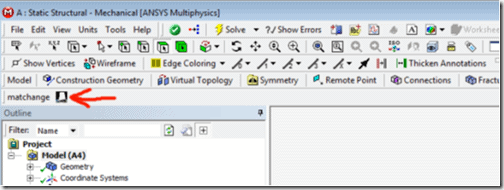
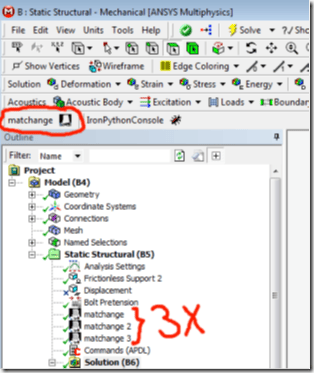
When you open the Mechanical editor, the new extension should show up in the menus. Here is what the material change button looks like after the extension has been loaded:
Each time you open a new Workbench session, you’ll need to click on Extensions > Manage Extensions if you want an extension to be loaded into the Mechanical editor.
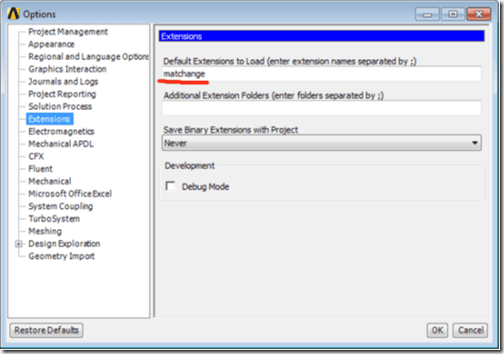
Alternatively, you can have an extension load every time by clicking on Tools > Options from the Workbench window, followed by a click on Extensions. Enter the name of the desired extension in the box, as shown here.
After clicking OK, any new Mechanical editor session will have the material change extension loaded.
So, what good is it? I will now show a simple example of implementation of the material change extension. The idea here is that we have a bolted connection and we want to look at two different conditions by changing the material properties of the washers to see what effect that has on the results. Using the material change extension, I can force the washers (and nuts and bolts too) to have a specific material number rather than the default value assigned by Workbench. The material number is used in the Mechanical APDL batch input file created by Workbench to identify which elements have which material properties.
Now before you APDL gurus get all riled up, yes, I know this can be done with the magic ‘matid’ parameter. That’s how we’ve been doing things like this for years. The material number extension is nicer since it’s an actual button built into the GUI. We’re really trying to show how extensions work here, not necessarily the best way to simulate a model with changing material properties.
That all being said, here is what it looks like. Clicking on the ‘matchange’ button in the menus inserts a new matchange object in the tree under the analysis type branch. In this example, the matchange button has been clicked three times, resulting in three matchange objects.
The matchange functionality requires that we create Named Selections for any entities for which we want to change material property numbers. How do I know that? When I downloaded the extension from the ANSYS Customer Portal, a nice read me .pdf file came along with it.
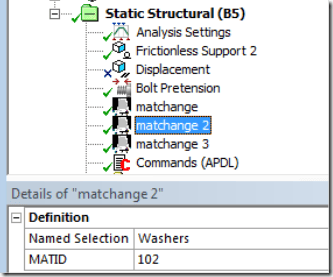
Here I have clicked on matchange 2 in the tree and identified the Named Selection for the entities I want to change, in this case the named selection Washers. I then entered my desired integer material number for these entities, 102.
Finally, in order to demonstrate that it works, I added on command snippet under the Static Structural branch, containing these APDL commands:
esel,s,mat,,102 ! select material 102 – washers.
mp,ex,102,15e6
mp,prxy,102,.29
mplist
allsel
Those commands select the washers by my user-defined material number (I could have also selected by named selection). The commands then define new material properties for material 102. Again, there are other ways to do this, but this shows the effect of the extension. Note that this command snippet is set in the details view to only be active for load step number 3. Load step one applies bolt pretension. Load step 2 solves for the operating load with the original material properties and load step 3 solves for the same loads but with the modified material properties for the washers.
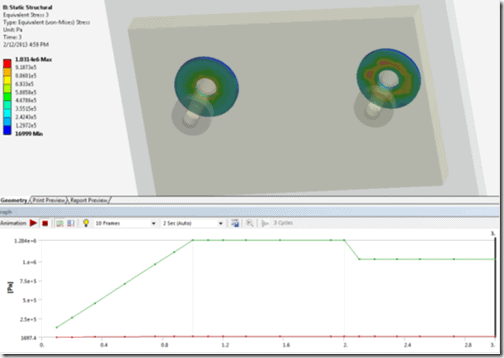
This plot shows von Mises stress in the washers vs. loadstep/substep. As you can see in the graph below the stress plot, indeed the von Mises stress is changing due to the material change from step 2 to step 3. This was a nonlinear analysis with large deflection turned on.
So, this should give you a taste of what extensions are and what can be done with them. The next time you are asked to do something in Workbench for which there isn’t a built-in menu, you may be able to say, “There’s an extension for that!”

