Editor’s Notes:
(3/5/2024): Changed the “not flagged” to “Complete.” I was forgetting what emails I had flagged. So I changed it to “Complete.”
(3/28/2023): Added more details on how to format the output of the link to the email and also added a final step to clear the flag.
(1/27/2023): Microsoft seemed to change the format for a link to the URL. So I updated Step 5 with the new format.
I know this is not a normal topic for PADT’s blog, but I just updated my Microsoft Flow for converting an email into a task, and it took me a while to find an example of what I wanted to do. So I thought I’d share what I did to get it to work.
Wait, You Need a Microsoft Flow For This?
Yup. In Microsoft Outlook Online, you can right-click on an email and make a ToDo task. But there is no way to do that in Outlook desktop or the mobile app, and it doesn’t make a planner task. And I use Microsoft Planner as my task management tool, not ToDo.
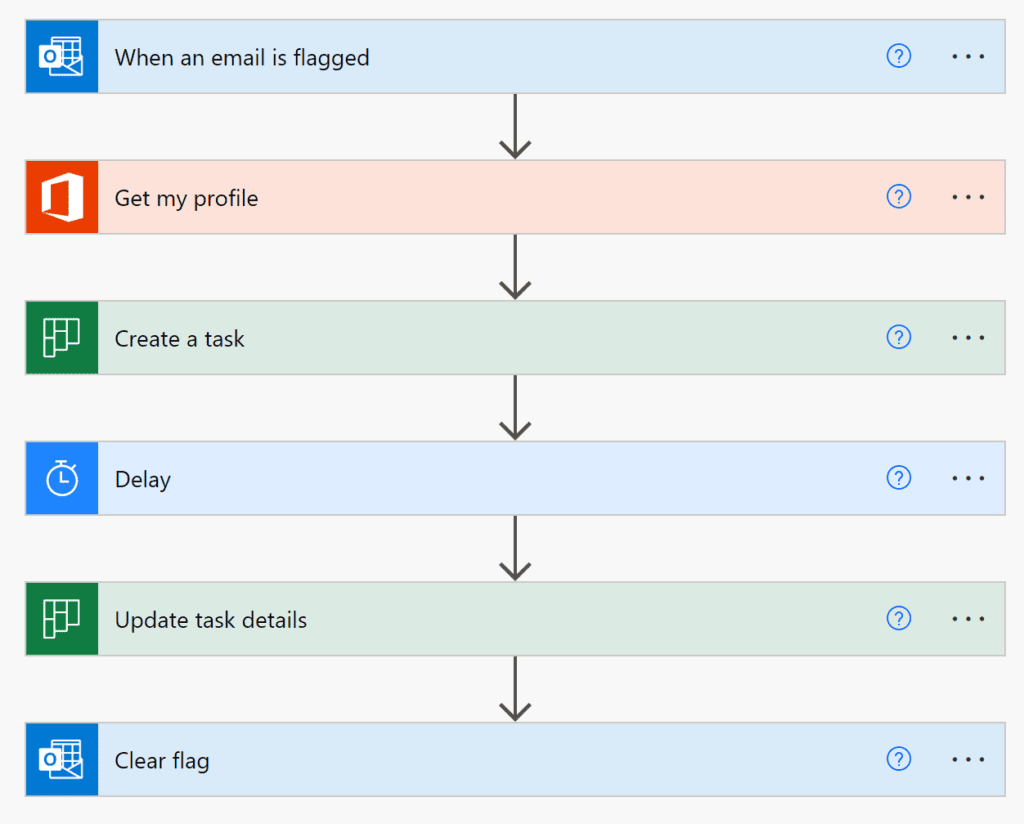
The recommended solution to this shortcoming is to use a Microsoft Flow to take any flagged email and make a task. There are a ton of examples for this on the interweb, and this served me well for a long time. The algorithm is:
- Start the Microsoft flow when an “email is flagged” event happens
- Get your user profile information
- Create a task
- Use the email subject as the task subject
- Put it in a bucket. I made one called “From Email” for this.
- Assign my Office365 User ID to assign the task to me
- Include a preview of the email body
- Create a URL that links to the email in Outlook online
- Clear the flag

But the Subject Alone was Not Enough
This worked for me for more than a year. But I found that half the time I was working my way through the task list, the email’s subject string was not enough to remind me what I needed to do. What I wanted was to capture who it was from and the start of the content. And ideally, a link to the email.
And you can’t add this info to a task when you create it, you have to modify it. And that generated an error.
The secret was that you couldn’t just modify a Planner task after you make it. You have to give it some time to make its way into the cloud, then modify it. So you add a Delay, then add “Update task Details.”
Here is my Microsoft flow.
1. Start with a Flagged Email:


2. Get your ID with “Get my Profile.”

3. Make the new task with “Create a task.”
Use the subject from the email to identify the task. Note that I already made a “From Email” bucket in my primary ToDo Plan. You can also make a plan just for email-based tasks. While I was in there, I also set the start date to the date of the email to let me know when it came in. Last but not least, I use my Azure ID to assign the new task to me.

4. Wait for it to get stored with “Delay.”
20 Seconds seems fine for me. Add more if it fails on you. This delay is critical to get the flow to work. If you don’t put the wait in, the information you need for future steps may not be in the cloud where you can get at it.

5. Add the info you want with “Update Task Details.”
Here is where you can get fancy. Use the ID from the plan to tell the flow which task you want to modify. If “Id” doesn’t show up in the dropdown, scroll down on the dropdown and choose “Enter Custom Value,” and choose “Id.”
Then fill in the description with stuff you think you will need when you read the task in a few days. I use:

That is a bit confusing, so here it is explained:
- Task: Id
- This is the internal Id of the task you just created and waited for
- Email: From
- From the email that triggered the flow, the email on the From line
- Expression: decodeUriComponent(‘%0A’)
- To get a new line of text, you have to use this function to create a unicode linefeed character
- Expression: decodeUriComponent(‘%0A’)
- Do it again to get a blank line
- Email: Body Preview
- Gives the first bunch of characters in the email instead of the whole body
- Expression: decodeUriComponent(‘%0A’)
- Line Feed
- Expression: decodeUriComponent(‘%0A’)
- Line feed
- Text: https://outlook.office365.com/owa/?ItemID=
- This is the first part of the URL needed to point to a message in the browser version of outlook.
- Email: Message Id
- Internal Id for the triggering email.
- &exvsurl=1&viewmodel=ReadMessageItem
- Arguments telling Outlook web interface to use the ID and open it for reading.
Now, if you want to get fancy, you could save the email message to a file on OneDrive, then put the link to the message in the Reference section. Sounds like a pain, and I’d rather deal with the email in Outlook.
6. Clear the Flag or Mark as Done with “Flag email (V2)”
Now that the task is created in planner, you should clear the flag on the email or, if you are like me, change the flag to a green check so you know it was added. I used to clear it and I found myself adding the same email to my planner multiple times.
Do that with a Flag email (V2) step. I renamed it “Clear Flag.” Set the Message Id to the ID for your message and then set Flag Status to “Not flagged”

Or change the status to Completed if you want the green check:

Check Out Your Shiney New Task
Here is what it looks like on my Plan:

And if I click on the task, I can see the information I want and the URL:

Give It a Try
I’ve not tried to share a flow outside of my organization before, but here is a zip file you can try and import:
Use at your own risk, etc…
While You are Here
I’m not sure how you ended up on PADT’s website, but if you happen to be a mechanical engineer or similar, check us out. We are an Ansys Elite Channel Partner, A Stratasys Diamond Partner, and one of the most respected providers of simulation, design, and 3D Printing services in the US. If any of those words mean something to you, contact us and let us know how we might be able to help. I’ll even flag your email so it shows up as a task in planner.
And if all of that engineer talk is goblidy gook, that is fine too. I’m glad we might have been able to help you.


