
One of the more popular questions I get for Ansys optiSlang is along the lines of: “I finished setting up my sensitivity/optimization workflow and then let it run for xx-xx days, but I realized that I should have run more design points/scaled one of my responses differently/defined different criteria. All the raw data is there – can I reuse it in Ansys optiSLang without having to rerun everything from scratch?” I am generally happy to say that, yes, we can do that! There are some slight caveats, and the actual preferred method of doing this changes a little depending on your workflow, but I’ll cover the four most common approaches here.
Method 1: Stacking a new Ansys OptiSLang Optimization System with a Wizard
In the case where not enough design points were run and either the CoP is not high enough or convergence wasn’t attained during optimization, this is easily resolved by stacking on a new sensitivity or optimization system via one of the wizards.

The especially nice thing about using this wizard method is that the entire previous workflow is exactly duplicated and all previous reference values/ranges/settings/etc. are preserved. On the first page of the wizard:

We can see that the option for ‘Receive all designs from system “TheSystemYouDroppedTheWizardOn”’ is automatically enabled. This is also tied to the below setting on one of the following wizard windows, where the start iteration is told to ‘Use start designs only.’

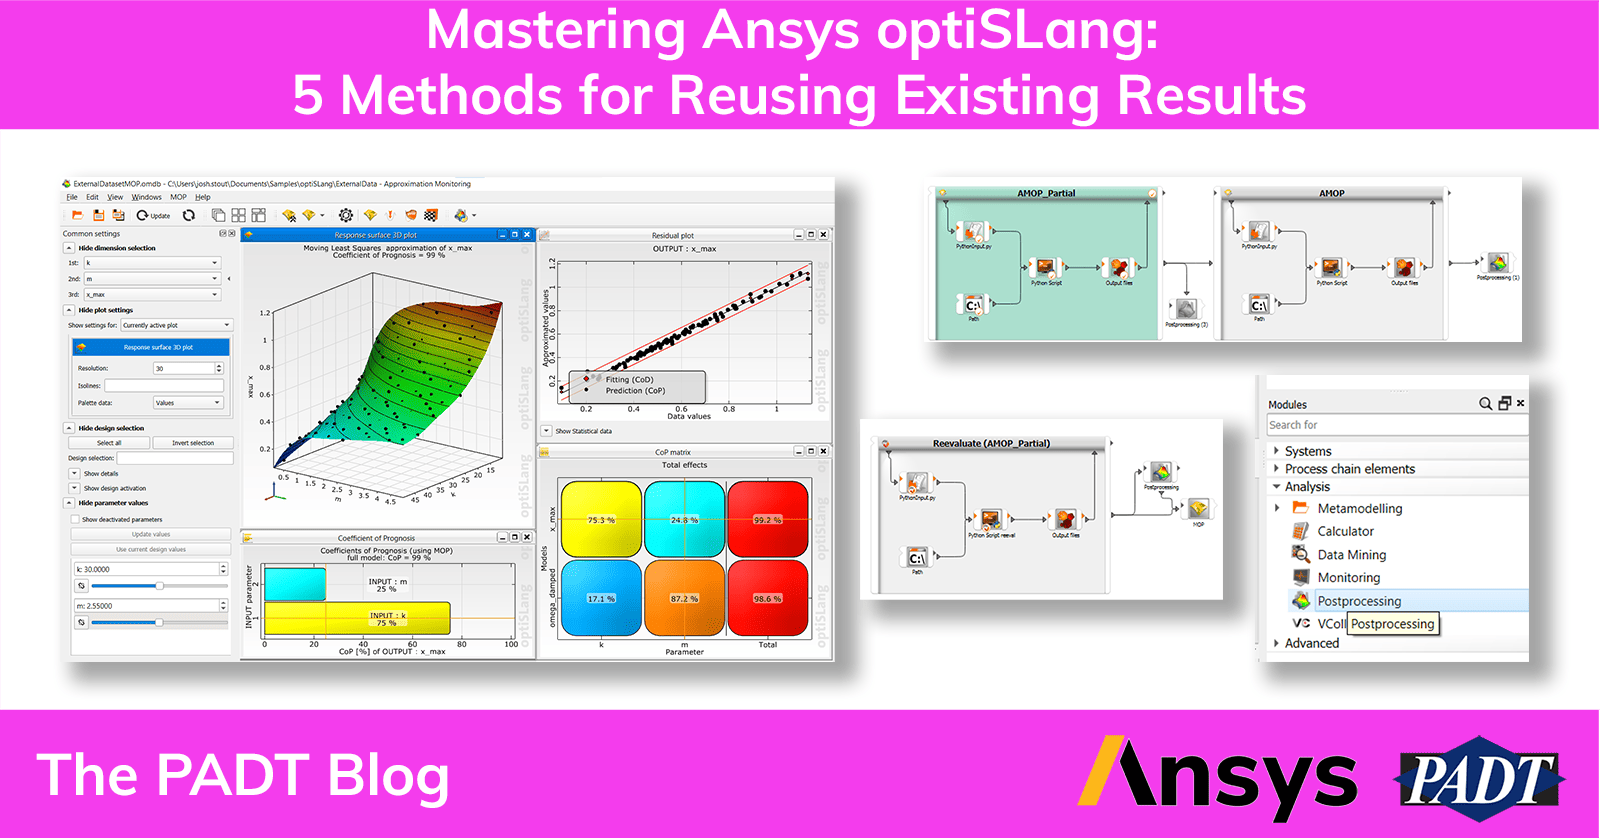
Basically, this is purely for appending some number of new designs to an existing dataset. We are not actually changing anything about our workflow or the determination of responses/criteria, we’re simply taking our analysis further and using the previous work as a starting point. The resulting Ansys optiSLang system is just a duplicated workflow that receives the start designs, criteria, and parameter manager from the prior one, and will look something like the ‘AMOP’ system below as it is attached to ‘AMOP_Partial’:

I think it’s also worth at least mentioning that we can of course set up this flow up manually. If you copy paste your original workflow (AMOP in the above), you can go into the new system’s settings and use the ‘import start designs from system’ option (or one of the other import options) in the ‘Start designs’ tab. Then, go to the Adaption tab and enable that same option for ‘Use start designs only’ in the start iteration settings as noted in the wizard-based approach. There is rarely a benefit to doing it manually though, so I always start with the wizard when I can.
Methods 2 and 3: Tuning an Ansys OptiSLang Optimization System
The second and third cases, where the responses or criteria themselves need some tuning, are more or less the same. There are a couple ways to accomplish either that I think are worth discussing, but the main point I’d like to make is that this is basically the scenario for which the ‘read mode’ in Ansys optiSLang was made. This option is available under the ‘Show additional options’ tab at the bottom of text input and execution style nodes.


‘Read mode’ for input nodes prevents the Ansys optiSLang from resampling the parameter space and accidentally overwriting the previous input values. ‘Read mode’ on the execution block prevents whatever script or solver is involved from actually being executed and generating new data. Then, if all the expected result files are present in the design directory, we can leave the output nodes as-is to just reprocess our results. To read in entirely new responses, they’ll have to already exist in those result files (or at least in the correct working directories), but we can set them up exactly we would anything else – go into the output node, set up your marker/location definitions, and register it as a response. For something a little more involved like custom scaling or weighting, we can move over to the Variables tab in our output block and add new variables through Right-click > Add variable. The ID and Expression columns may be modified freely, and the expression definition can use any of the built-in Ansys optiSLang calculator functions, input parameters, or previously defined responses/variables.

Once that variable is set up as desired, it can be registered as a response by left-click-dragging its row in the variable window over to the Responses section. One additional note is that once any changes are made to a node that has previously been run and you select ‘OK’ or ‘Apply’, you will be prompted with a reset window. Technically speaking, as long as we have only touched individual nodes rather than the entire system, our files should not be in danger of being deleted even if we do a ‘reset full’. However, unless my goal is to completely start the entire workflow over, then my personal preference is to go through the ‘Advanced reset scenario’ and disable ‘clear working directory’ just to be safe.


Note that if we’re using this manual approach where we enable read mode, then we will have to reset the workflow definition as well, and this is the time at which you MUST disable ‘clear working directory’ if you want to reuse simulation data stored by optiSLang.
Method 4: The Ansys optiSLang Reevaluation Wizard
Are we confused yet? I would certainly not blame anyone for getting a little bit lost by now, and this is what leads me to the next method: the Reevaluation Wizard. This basically automates everything that we just discussed with the read mode.

This is applied the same way as any other wizard that builds on top of another system – you drag and drop it onto the prior system’s workflow. You will be prompted with some options for the path to design directories (these will be automatically populated if you’ve dragged it onto the correct reference system), merging data sets, and adjusting post processing type, but we will leave these as the default. The end result is a completely new ‘Reevaluate’ system, as below!

Note that the input and execution nodes have the ‘read mode’ icons already present on them, so we don’t need to modify anything within them. This new system gives us quite a bit of security since it functions by reading the prior system’s working directories rather than depending on its own. That means any reset operations associated with this Reevaluate system are comparatively safe. All that needs to be done here is to go into the ‘output files’ node and add new variables/responses based on the existing data.
Method 5: Using an Existing External Data Set in optSLang
This pretty much covers how to expand and reuse data from an existing Ansys optiSLang workflow. Now, what do we do in the case where we have a full external data set that we want to analyze and/or build a model around? Maybe it’s simulation data coming from another DoE style tool or maybe it’s experimental data that was measured in the real world. Obviously, that’s going to be a little different than the above since there’s not an existing folder structure laid out in a format that Ansys optiSLang is familiar with. In this case, we can go straight into postprocessing and read in data from a .csv style format.

The Ansys optiSLang postprocessing node can be found under the Analysis section of modules, and we can drag this into our workspace like any other component. Then, open its settings to point it towards your data file and then click ‘Show Postprocessing’.

There will immediately be a pop-up window to walk you through the text import process, for which I will only point out a few key items:
- The default format is tab delimited, but we can customize this as needed.
- The ‘Manipulate’ portion gives us the option to create new data columns as a function of other columns – this is like adding an internal variable and then registering it as a response in the prior examples.
- On the last page, ‘Finalize’, make sure to adjust the dimension type of your responses. The column needs to be registered as a response in order to have a MOP built for it. Also, there’s no concept of objectives yet since we’re just reading existing data.
Note that in the example below, the preview window is showing us that the data is not being read correctly. There are commas left in the read-in values since I have not selected ‘comma’ as the delimiter type yet – make sure you pay attention to the preview!

Once loaded in, the default view is ‘Statistics’ with simple correlation data, histogram, and anthill plot. We can freely load in other default views into Ansys optiSLang and/or add our own plots from the list of plots on the bottom right of the postprocessing window. To use any plots that involved an MOP, we can generate that using the ‘Create and update’ or ‘Create and save as new’ database options.


With the MOP generated and response surface plot enabled, our postprocessing view will pretty much be identical to what we would see in a pure Ansys optiSLang workflow. Note that the MOP itself is contained within the .omdb database file that we save from this window, so we can even do fancier things like use the MOP solver and perform optimization on this external dataset.
Go Forth and Optimize in Ansys optiSLang with Existing Results
In summary, we have reviewed several approaches for adding new design points to an existing Ansys optiSlang system, manually and wizardly making use of the ‘read mode’ to re-extract information from existing design points, and even reading in entire external data sets to post process and build models around. Any one of these may be the best approach depending on the particular need, and with enough familiarity of the steps involved, we can even combine them in other ways. Hopefully, this serves as a good step along the way to accomplishing this.
Please contact us if you have any questions about Ansys optSLang, other Ansys tools, or leveraging PADT experts for training, mentoring, or consulting.
Happy optimizing!


