
Last week’s PADT ANSYS Webinar Series webinar was on a little-used feature in ANSYS Mechanical called Design Assessment, or DA. If you missed it, here is a PDF of the PowerPoint:

As promised, this week’s The Focus posting will be a follow-up on that webinar with an in-depth look at the scripts that were used in the example. But first, let us review what DA is for those that don’t remember, fell asleep, or don’t want to sit through 60+ minutes of me mumbling into the telephone.
Review of DA
Design Assessment is a tool in ANSYS Workbench that works with ANSYS Mechanical to take results from multiple time or load steps, perform post processing on those results, and bring the calculated values back into ANSYS Mechanical for viewing as contour plots. It was developed to allow the ANSYS, Inc. developers to add some special post processing tools needed in the off shore industry, but as they were working on it they saw the value of exposing the Application Programmers Interface (API) to the user community so anyone can write their own post processing tools.

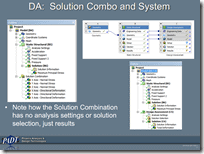
You use it by adding a Design Assessment system to you project. In its most basic form, the default configuration, it is set up to do load case combinations. That in itself is worth knowing how to use it. But if you want to do more, you can point it to a custom post processing set of files and do your own calculations.
A custom DA is defined by two things. First is an XML file that tells ANSYS Mechanical what user input you want to capture, how you want to get results out of mechanical, what you want to do with the results, and how you want them displayed in your model tree. Second is one or more Python scripts that actually do the work of capturing what the user input, getting results, doing the calculation, and sticking the resulting values back in the model. Both are well documented and, once you get your head around the whole thing, pretty simple.
Right now DA works with Static and Transient Structural models. It also only allows access to element stress values. Lots of good enhancements are coming in R14, but R13 is mature enough to use now.
If that review was too quick, review the recording or the PowerPoint presentation.
A Deep Dive Into an Example
For the webinar we had a pretty simple, and a bit silly, example – the custom post processing tool took the results from a static stress model and truncates the stress values if they are above or below a user specified value. Not a lot of calculating but a good example of how the tool works.
Note, this posting is going to be long because there is a lot of code pasted in. For each section of code I’ll also include a link to the original file so you can download that yourself to use.
Here is the XML file for the example:
<?xml version="1.0" encoding="utf-8"?>
<!--
www.PADTINC.com
XML file for ANSYS DA R13
Demonstration of how to use DA at R13
Goes through results and sets stresses below floor value to floor
value and above ceiling value to ceiling value.
User adds DA Result to specify Floor and Ceiling
Attribute group can be used to specify a comment
Calls da_trunc_solve.py and da_trunc_eval.py in c
Eric Miller
5/18/2011
-->
<DARoot ObjId ="1" Type="CAERep" Ver="2">
<Attributes ObjId="2" Type="CAERepBase" Ver="2">
<DAAttribute ObjId="101" Type="DAAttribute" Ver="2">
<AttributeName PropType="string">Stress Value</AttributeName>
<AttributeType PropType="string">DropDown</AttributeType>
<Application PropType="string">All</Application>
<Validation PropType="vector&lt;string>">
SX,SY,SZ,SXY,SYZ,SXZ,S1,S2,S3,SEQV
</Validation>
</DAAttribute>
<DAAttribute ObjId="102" Type="DAAttribute" Ver="2">
<AttributeName PropType="string">Stress Floor</AttributeName>
<AttributeType PropType="string">Double</AttributeType>
<Application PropType="string">All</Application>
<Validation PropType="vector&lt;string>">-1000000,10000000</Validation>
</DAAttribute>
<DAAttribute ObjId="103" Type="DAAttribute" Ver="2">
<AttributeName PropType="string">Stress Ceiling</AttributeName>
<AttributeType PropType="string">Double</AttributeType>
<Application PropType="string">All</Application>
<Validation PropType="vector&lt;string>">-1000000,10000000</Validation>
</DAAttribute>
<DAAttribute ObjId="201" Type="DAAttribute" Ver="2">
<AttributeName PropType="string">User Comments</AttributeName>
<AttributeType PropType="string">Text</AttributeType>
<Application PropType="string">All</Application>
</DAAttribute>
</Attributes>
<AttributeGroups ObjId ="3" Type="CAERepBase" Ver="2">
<DAAttributeGroup ObjId="100002" Type="DAAttributeGroup" Ver="2">
<GroupType PropType="string">User Comments</GroupType>
<GroupSubtype PropType="string">Failure Criteria</GroupSubtype>
<AttributeIDs PropType="vector&lt;unsigned int>">201</AttributeIDs>
</DAAttributeGroup>
</AttributeGroups>
<DAScripts ObjId="4" Type="DAScripts" Ver="2">
<Solve PropType="string">c
<Evaluate PropType="string">c
<DAData PropType="int">1</DAData>
<CombResults PropType="int">1</CombResults>
<SelectionExtra PropType="vector&lt;string>">DeltaMin, DeltaMax</SelectionExtra>
</DAScripts>
<Results ObjId="5" Type="CAERepBase" Ver="2">
<DAResult ObjId ="110000" Type="DAResult" Ver="2">
<GroupType PropType="string">Ceiling and Floor Values</GroupType>
<AttributeIDs PropType="vector&lt;unsigned int>">101,102,103</AttributeIDs>
<DisplayType PropType="string">ElemCont</DisplayType>
</DAResult>
</Results>
</DARoot>
I always have to go over XML files a few times to figure them out. There is a lot of information, but only a small amount that you need to pay attention to. After a while, you figure out which is which.
Now on to the fun part, the Python scripts. The first one gets executed when the user chooses solve.
da_trunc_solve.py is shown below. The comments inside pretty much explain it all. It basically does two things: creates an ANSYS MAPDL macro that extracts all the element stresses and puts them in a text file, then it runs MAPDL with that macro.
import subprocess
import os
import shutil

#======================================================================
#
#   ------------------------------------------------------------  PADT
#    www.PADTINC.com
#
#    da_trunc_solve.py
#         Demonstration python script for Design Assessment in
#            ANSYS R13
#         Called on solve from ANSYS Mechanical
#         Bulk of code copied and modified from TsaiWu example
#            provided by ANSYS, Inc.
#
#       E. Miller
#       5/18/2011
#======================================================================
def trunc_solve(DesignAssessment) :

# Get number of elements in model


# Change directory to current workspace for DA
originaldir = os.getcwd()
os.chdir(DesignAssessment.getHelper().getResultPath())

#Get the path to the results file name and the location of the temp directory
rstFname = DesignAssessment.Selection(0).Solution(0).getResult().ResultFilePath()
rstFname = rstFname.rstrip('.rst')
apath = DesignAssessment.getHelper().getResultPath()

print "Result File:", rstFname
print "Apath:", apath

# Write an ANSYS APDL macro to start ANSYS, resume the result file, grab the stress
#   results and write them to a file

macfile = open(DesignAssessment.getHelper().getResultPath()+"\\runda1.inp", "w")

macfile.write("/batch\n")
macfile.write("/post1\n")
macfile.write("file,"+rstFname+"\n")
macfile.write("set,last\n")
macfile.write("*get,emx,elem,,num,max\n")
macfile.write("*dim,evls,,emx,10\n")
macfile.write("etable,esx,s,x\n")
macfile.write("etable,esy,s,y\n")
macfile.write("etable,esz,s,z\n")
macfile.write("etable,esxy,s,xy\n")
macfile.write("etable,esyz,s,yz\n")
macfile.write("etable,esxz,s,xz\n")
macfile.write("etable,es1,s,1\n")
macfile.write("etable,es2,s,2\n")
macfile.write("etable,es3,s,3\n")
macfile.write("etable,eseqv,s,eqv\n")
macfile.write("*vget,evls(1, 1),elem,1,etab,  esx\n")
macfile.write("*vget,evls(1, 2),elem,1,etab,  esy\n")
macfile.write("*vget,evls(1, 3),elem,1,etab,  esz\n")
macfile.write("*vget,evls(1, 4),elem,1,etab, esxy\n")
macfile.write("*vget,evls(1, 5),elem,1,etab, esyz\n")
macfile.write("*vget,evls(1, 6),elem,1,etab, esxz\n")
macfile.write("*vget,evls(1, 7),elem,1,etab,  es1\n")
macfile.write("*vget,evls(1, 8),elem,1,etab,  es2\n")
macfile.write("*vget,evls(1, 9),elem,1,etab,  es3\n")
macfile.write("*vget,evls(1,10),elem,1,etab,eseqv\n")

macfile.write("*cfopen,darsts,txt\n")
macfile.write("*vwrite,evls(1,1),evls(1,2),evls(1,3),evls(1,4),evls(1,5),evls(1,6),evls(1,7),evls(1,8),evls(1,9),evls(1,10)\n")
macfile.write("(G16.9, X, G16.9, X, G16.9, X, G16.9, X, G16.9, X, G16.9, X, G16.9, X, G16.9, X, G16.9, X, G16.9)\n")
macfile.write("*cfclose\n")
macfile.write("finish\n")
macfile.write("/exit,nosave\n")

macfile.close()

# Set up execution of ANSYS MAPDL.
#   Note: Right now you need to grab a different license than what Workbench is using
exelocation = "C:\\Program Files\\ANSYS Inc\\v130\\ansys\\bin\\winx64\\ansys130.exe"
commandlinestring = " -p ansys -b nolist -i runda1.inp -o runda1.out /minimise"

#Execute MAPDL and wait for it to finish
proc = subprocess.Popen(commandlinestring,shell=True,executable=exelocation)
rc = proc.wait()

# Read the output fromt the run and echo it to the DA log file
File = open("runda1.out","r")
DesignAssessment.getHelper().WriteToLog(File.read())
File.close()

# Go back to the original directory
os.chdir(originaldir)

trunc_solve(DesignAssessment
Some key things you should note about this script:
- You have to use MAPDL to get your stress values. Right now there is no method in the API to get the values directly.
- You need a second MAPDL license in order to run this script. It does not share the license you are using for ANSYS Mechanical at R13. This should be addressed in R14.
- One work around right now is to use an APDL code snippet in the ANSYS mechanical run that makes the text file when the original problem is solved. The SOLVE script is then no longer needed and you can just have an evaluate script. Not a great solution but it will work if you only have once seat of ANSYS available.
- Note the directory changes and getting of result file paths. This is important. Mechanical does stuff all over the place and not in just one directory.
- Make sure the MAPDL execution stuff is correct for your installation.
Once the solve is done and our text file, darsts.txt, is written, we can start truncating with the evaluate script, da_trunc_eval.py:
import subprocess
import os
import shutil
import sys

#======================================================================
#
#   ------------------------------------------------------------  PADT
#    www.PADTINC.com
#
#    da_trunc_eval.py
#         Demonstration python script for Design Assessment in
#            ANSYS R13
#         Called on eval from ANSYS Mechanical
#         Bulk of code copied and modified from TsaiWu example
#            provided by ANSYS, Inc.
#
# NOTE: Right now it just does SX.  XML and script need to be modified to allow user
#       to specify component to use (X, Y, or Z)
#
#       E. Miller
#       5/18/2011
#======================================================================
def trunc_eval(DesignAssessment) :

	# Change directory to current workspace for DA
	originaldir = os.getcwd()
	os.chdir(DesignAssessment.getHelper().getResultPath())

	# Find number of elements in DA
	Mesh = DesignAssessment.GeometryMeshData()
	Elements = Mesh.Elements()
	Ecount = len(Elements)
	print "DA number of elements is ",Ecount
	print "Number of Result Groups:",DesignAssessment.NoOfResultGroups()

	# get User comment from Atribute Group
	# Note: Assuems one.  Need to use a loop for multiple
	attg = DesignAssessment.AttributeGroups()
	atts = attg[0].Attributes()
	usercomment = atts[0].Value().GetAsString()
	print "User Comment = ", usercomment

        # create arrays for SX/Y/Z values
	sx = []
	sy =  []
	sz = []
	sxy = []
	syz =  []
	sxz = []
	s1 = []
	s2 = []
	s3 = []
	seqv = []
	# read file written during solve phase
	#   append stress values to SX/Y/Z arrays
	File = open("darsts.txt","r")
	for line in File:
		words = line.split()
		sx.append(float(words[0]))
		sy.append(float(words[1]))
		sz.append(float(words[2]))
		sxy.append(float(words[3]))
		syz.append(float(words[4]))
		sxz.append(float(words[5]))
		s1.append(float(words[6]))
		s2.append(float(words[7]))
		s3.append(float(words[8]))
		seqv.append(float(words[9]))
	File.close()

	# Loop over DA Results created by user
	for ResultGroupIter in range(DesignAssessment.NoOfResultGroups()):
		# Get the Result Group
		ResultGroup = DesignAssessment.ResultGroup(ResultGroupIter)
		# Extract Cieling and Floor for the Group
		strscmp  = ResultGroup.Attribute(0).Value().GetAsString()
		strFloor = float(ResultGroup.Attribute(1).Value().GetAsString())
		strCeil  = float(ResultGroup.Attribute(2).Value().GetAsString())
		print "DA Result", ResultGroupIter+1, ":", strFloor, strCeil

		#Add a set of results to store values in
		ResultStructure = ResultGroup.AddStepResult()

		print "strscmp", strscmp

		# Loop on elements
		for ElementIter in range(Ecount):
			#Add a place to put the results for this element
			ResultValue = ResultStructure.AddElementResultValue()
			# Get the element number and then grab SX values that
			#   was read from file
			Element = Mesh.Element(ElementIter).ID()

			if strscmp == "SX":
				sss = sx[Element-1]
			elif strscmp == "SY":
				sss = sy[Element-1]
			elif strscmp == "SZ":
				sss = sz[Element-1]
			elif strscmp == "SXY":
				sss = sxy[Element-1]
			elif strscmp == "SYZ":
				sss = syz[Element-1]
			elif strscmp == "SXZ":
				sss = sxz[Element-1]
			elif strscmp == "S1":
				sss = s1[Element-1]
			elif strscmp == "S2":
				sss = s2[Element-1]
			elif strscmp == "S3":
				sss = s3[Element-1]
			elif strscmp == "SEQV":
				sss = seqv[Element-1]

			# Compare to Ceiling and Floor and truncate if needed
			if sss > strCeil:
				sss = strCeil
			if sss < strFloor:
				sss = strFloor
			# Store the stress value
			ResultValue.setValue(sss)
	# Go back to the original directory
	os.chdir(originaldir)

trunc_eval(DesignAssessment)
This script is a little more sophisticated. First it simply reads the darsts.txt file into a python array. It then has to go through a list of DA Results objects that the user added to their model and extract the stress value wanted as well as the floor and ceiling to truncate to. For each result object requested, it then loops through all the elements truncating as needed. Then it stores the truncated values.
import subprocess
import os
import shutil
import sys

#======================================================================
#
#   ------------------------------------------------------------  PADT
#    www.PADTINC.com
#
#    da_trunc_eval.py
#         Demonstration python script for Design Assessment in
#            ANSYS R13
#         Called on eval from ANSYS Mechanical
#         Bulk of code copied and modified from TsaiWu example
#            provided by ANSYS, Inc.
#
# NOTE: Right now it just does SX.  XML and script need to be modified to allow user
#       to specify component to use (X, Y, or Z)
#
#       E. Miller
#       5/18/2011
#======================================================================
def trunc_eval(DesignAssessment) :

# Change directory to current workspace for DA
originaldir = os.getcwd()
os.chdir(DesignAssessment.getHelper().getResultPath())

# Find number of elements in DA
Mesh = DesignAssessment.GeometryMeshData()
Elements = Mesh.Elements()
Ecount = len(Elements)
print "DA number of elements is ",Ecount
print "Number of Result Groups:",DesignAssessment.NoOfResultGroups()

# get User comment from Atribute Group
# Note: Assuems one.  Need to use a loop for multiple
attg = DesignAssessment.AttributeGroups()
atts = attg[0].Attributes()
usercomment = atts[0].Value().GetAsString()
print "User Comment = ", usercomment

# create arrays for SX/Y/Z values
sx = []
sy =  []
sz = []
sxy = []
syz =  []
sxz = []
s1 = []
s2 = []
s3 = []
seqv = []
# read file written during solve phase
#   append stress values to SX/Y/Z arrays
File = open("darsts.txt","r")
for line in File:
words = line.split()
sx.append(float(words[0]))
sy.append(float(words[1]))
sz.append(float(words[2]))
sxy.append(float(words[3]))
syz.append(float(words[4]))
sxz.append(float(words[5]))
s1.append(float(words[6]))
s2.append(float(words[7]))
s3.append(float(words[8]))
seqv.append(float(words[9]))
File.close()

# Loop over DA Results created by user
for ResultGroupIter in range(DesignAssessment.NoOfResultGroups()):
# Get the Result Group
ResultGroup = DesignAssessment.ResultGroup(ResultGroupIter)
# Extract Cieling and Floor for the Group
strscmp  = ResultGroup.Attribute(0).Value().GetAsString()
strFloor = float(ResultGroup.Attribute(1).Value().GetAsString())
strCeil  = float(ResultGroup.Attribute(2).Value().GetAsString())
print "DA Result", ResultGroupIter+1, ":", strFloor, strCeil

#Add a set of results to store values in
ResultStructure = ResultGroup.AddStepResult()

print "strscmp", strscmp

# Loop on elements
for ElementIter in range(Ecount):
#Add a place to put the results for this element
ResultValue = ResultStructure.AddElementResultValue()
# Get the element number and then grab SX values that
#   was read from file
Element = Mesh.Element(ElementIter).ID()

if strscmp == "SX":
sss = sx[Element-1]
elif strscmp == "SY":
sss = sy[Element-1]
elif strscmp == "SZ":
sss = sz[Element-1]
elif strscmp == "SXY":
sss = sxy[Element-1]
elif strscmp == "SYZ":
sss = syz[Element-1]
elif strscmp == "SXZ":
sss = sxz[Element-1]
elif strscmp == "S1":
sss = s1[Element-1]
elif strscmp == "S2":
sss = s2[Element-1]
elif strscmp == "S3":
sss = s3[Element-1]
elif strscmp == "SEQV":
sss = seqv[Element-1]

# Compare to Ceiling and Floor and truncate if needed
if sss > strCeil:
sss = strCeil
if sss < strFloor:
sss = strFloor
# Store the stress value
ResultValue.setValue(sss)
# Go back to the original directory
os.chdir(originaldir)

trunc_eval(DesignAssessment)
Some things to note about this script are:
- The same directory issues hold here. Make sure you follow them
- Always loop on ResultGroups. You can assume the number of attributes is constant but you never know how many results the user has asked for.
- In this example it is assumed that the stress label is the first attribute and that the floor and ceiling are the second and third. This is probably lazy on my part and it should be more general.
- The way to make it more general is to loop on the attributes in a group and grab their label, then use the label to determine which value it represents.
- Before you can store values, you have to create the result object and then each result value in that structure:
- ResultStructure = ResultGroup.AddStepResult() for each result object the user adds to the tree
- ResultValue = ResultStructure.AddElementResultValue() for each element
- ResultValue.setValue(sss) to set the actual value
And that is our example. It should work with any model, just make sure you get the paths right for where the files are.
Be a Good Citizen and Share!
If you have the gumption to go and try this tool out, we do ask that you share what you come up with. A good place is www.ANSYS.NET. That is the repository for most things ANSYS. If you have questions or need help, try xansys.org or your ANSYS support provider.
Happy Assessing!


