Why I chose C#?
Most ACT extensions are written in Python. Python is a wonderfully useful language for quickly prototyping and building applications, frankly of all shapes and sizes. Its weaker type system, plethora of libraries, large ecosystem and native support directly within the ACT console make it a natural choice for most ACT work. So, why choose to move to C#?
The primary reasons I chose to use C# instead of python for my ACT work were the following:
- I prefer the slightly stronger type safety afforded by the more strongly typed language. Having a definitive compilation step forces me to show my code first to a compiler. Only if and when the compiler can generate an assembly for my source do I get to move to the next step of trying to run/debug. Bugs caught at compile time are the cheapest and generally easiest bugs to fix. And, by definition, they are the most likely to be fixed. (You’re stuck until you do…)
- The C# development experience is deeply integrated into the Visual Studio developer tool. This affords not only a great editor in which to write the code, but more importantly perhaps the world’s best debugger to figure out when and how things went wrong. While it is possible to both edit and debug python code in Visual Studio, the C# experience is vastly superior.
The Cost of Doing ACT Business in C#
Unfortunately, writing an ACT extension in C# does incur some development cost in terms setting up the development environment to support the work. When writing an extension solely in Python you really only need a decent text editor. Once you setup your ACT extension according to the documented directory structure protocol, you can just edit the python script files directly within that directory structure. If you recall, ACT requires an XML file to define the extension and then a directory with the same name that contains all of the assets defining the extension like scripts, images, etc… This “defines” the extension.
When it comes to laying out the requisite ACT extension directory structure on disk, C# complicates things a bit. As mentioned earlier, C# involves a compilation step that produces a DLL. This DLL must then somehow be loaded into Mechanical to be used within the extension. To complicate things a little further, Visual Studio uses a predefined project directory structure that places the build products (DLLs, etc…) within specific directories of the project depending on what type of build you are performing. Therefore the compiled DLL may end up in any number of different directories depending on how you decide to build the project. Finally, I have found that the debugging experience within Visual Studio is best served by leaving the DLL located precisely wherever Visual Studio created it.
Here is a summary list of the requirements/problems I encountered when building an ACT extension using C#
- I need to somehow load the produced DLL into Mechanical so my extension can use it.
- The DLL that is produced during compilation may end up in any number of different directories on disk.
- An ACT Extension must conform to a predefined structural layout on the filesystem. This layout does not map cleanly to the Visual studio project layout.
- The debugging experience in Visual Studio is best served by leaving the produced DLL exactly where Visual Studio left it.
The solution that I came up with to solve these problems was twofold.
First, the issue of loading the proper DLL into Mechanical was solved by using a combination of environment variables on my development machine in conjunction with some Python programming within the ACT main python script. Yes, even though the bulk of the extension is written in C#, there is still a python script to sort of boot-load the extension into Mechanical. More on that below.
Second, I decided to completely rebuild the ACT extension directory structure on my local filesystem every time I built the project in C#. To accomplish this, I created in visual studio what are known as post-build events that allow you to specify an action to occur automatically after the project is successfully built. This action can be quite generic. In my case, the “action” was to locally run a python script and provide it with a few arguments on the command line. More on that below.
Loading the Proper DLL into Mechanical
As I mentioned above, even an ACT extension written in C# requires a bit of Python code to bootstrap it into Mechanical. It is within this bit of Python that I chose to tackle the problem of deciding which dll to actually load. The code I came up with looks like the following:
Essentially what I am doing above is querying for the presence of a particular environment variable that is on my machine. (The assumption is that it wouldn’t randomly show up on end user’s machine…) If that variable is found and its value is 1, then I determine whether or not to load a debug or release version of the DLL depending on the type of build. I use two additional environment variables to specify where the debug and release directories for my Visual Studio project exist. Finally, if I determine that I’m running on a user’s machine, I simply look for the DLL in the proper location within the extension directory. Setting up my python script in this way enables me to forget about having to edit it once I’m ready to share my extension with someone else. It just works.
Rebuilding the ACT Extension Directory Structure
The final piece of the puzzle involves rebuilding the ACT extension directory structure upon the completion of a successful build. I do this for a few different reasons.
- I always want to have a pristine copy of my extension laid out on disk in a manner that could be easily shared with others.
- I like to store all of the various extension assets, like images, XML files, python files, etc… within the Visual Studio Project. In this way, I can force the project to be out of date and in need of a rebuild if any of these files change. I find this particularly useful for working with the XML definition file for the extension.
- Having all of these files within the Visual Studio Project makes tracking thing within a version control system like SVN or git much easier.
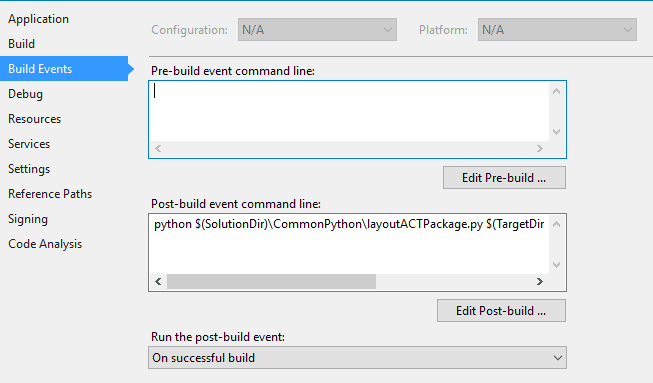
As I mentioned before, to accomplish this task I use a combination of local python scripting and post build events in Visual Studio. I won’t show the entire python code, but essentially what it does is programmatically work through my local file system where the C# code is built and extract all of the files needed to form the ACT extension. It then deletes any old extension files that might exist from a previous build and lays down a completely new ACT extension directory structure in the specified location. The definition of the post build event is specified within the project settings in Visual Studio as follows:
As you can see, all I do is call out to the system python interpreter and pass it a script with some arguments. Visual Studio provides a great number of predefined variables that you can use to build up the command line for your script. So, for example, I pass in a string that specifies what type of build I am currently performing, either “Debug” or “Release”. Other strings are passed in to represent directories, etc…
The Synergies of Using Both Approaches
Finally, I will conclude with a note on the synergies you can achieve by using both of the approaches mentioned above. One of the final enhancements I made to my post build script was to allow it to “edit” some of the text based assets that are used to define the ACT extension. A text based asset is something like an XML file or python script. What I came to realize is that certain aspects of the XML file that define the extension need to be different depending upon whether or not I wish to debug the extension locally or release the extension for an end user to consume. Since I didn’t want to have to remember to make those modifications before I “released” the extension for someone else to use, I decided to encode those modifications into my post build script. If the post build script was run after a “debug” build, I coded it to configure the extension for optimal debugging on my local machine. However, if I built a “release” version of the extension, the post build script would slightly alter the XML definition file and the main python file to make it more suitable for running on an end user machine. By automating it in this way, I could easily build for either scenario and confidently know that the resulting extension would be optimally configured for the particular end use.
Conclusions
Now that I have some experience in writing ACT extensions in C# I must honestly say that I prefer it over Python. Much of the “extra plumbing” that one must invest in in order to get a C# extension up and running can be automated using the techniques described within this post. After the requisite automation is setup, the development process is really straightforward. From that point onward, the increased debugging fidelity, added type safety and familiarity a C based language make the development experience that much better! Also, there are some cool things you can do in C# that I’m not 100% sure you can accomplish in Python alone. More on that in later posts!
If you have ideas for an ACT extension to better serve your business needs and would like to speak with someone who has developed some extensions, please drop us a line. We’d be happy to help out however we can!


