
Earlier this year, I had a support case with a customer looking to automate the extraction of image results from a large DOE. We quickly settled on Ansys Mechanical Scripting as the best solution and were largely able to automate the workflow. One interesting question that arose was how to parameterize values in Mechanical that aren’t natively supported by the DOE engine. Originally, this article began as an answer to that question.
But when writing what I thought was going to be a quick example of editing a pressure became an article in its own right, this post was born! Think of this article as learning to walk before we can run. In the future, I hope to look at some more advanced topics, but for now, I’ll cover an example of how to edit the magnitude of a pressure boundary condition and then show how to use the record feature as a springboard for result object creation.
If you have never utilized Ansys Mechanical scripting before, it is a powerful way to edit your model without the GUI. For example, it can be used to automate boundary or result set creation, export text and image results after a successful solve, and, relevant to our current purposes, edit the details window of any tree object.
As with most scripting languages, there is more than one way to go about things. The example I will show now is, in my opinion, not the most elegant, but it is the simplest to explain. If you finish this article and are hungry for more, resources on Python scripting and ACT (Ansys Customization Toolbox) can be found on the Ansys Learning Hub at Structures | Customization – Ansys Mechanical Scripting (sapjam.com).
A Simple Example of Ansys Mechanical Scripting: Applying a Pressure
Say we want to edit the magnitude of this pressure boundary condition using scripting. Currently, my pressure has a magnitude of 10 MPa, but I want to change this to 100 MPa. Obviously, we could just type in 100 and be done, but I prefer to start with easy to verify examples like this whenever I begin a new script.

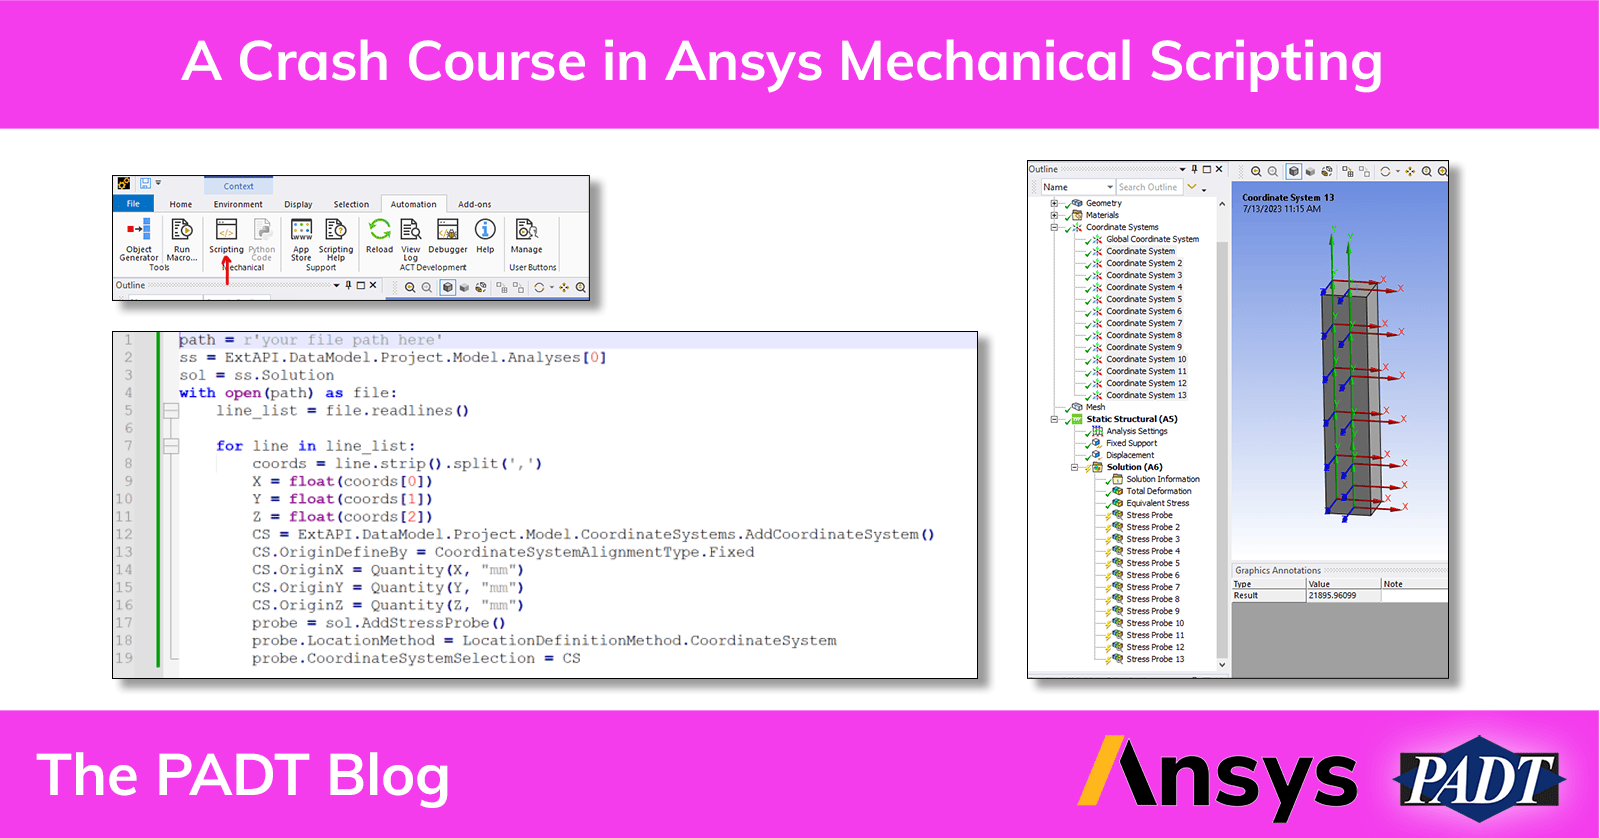
First things first, we need to launch the scripting interface. This can be done through the automation toolbar and the scripting button.

Once launched, we have access to the command line and the editor. Ansys Mechanical scripting uses the Python language, so it is very easy to pick up for anyone who has used Python before.

I’ll go ahead and spoil the single line command we need to change the magnitude to 100 and then explain each facet of it.
ExtAPI.DataModel.Project.Model.Analyses[0].Children[1].VisibleProperties[7].InternalValue = 100.0Like I said, this command isn’t winning any beauty contests. Ansys has been adding APIs to make modifications like this much more readable, so it’s definitely a choice to go about the editing this way. Still, I think this example works best for someone who has only interacted with the GUI up until now. Breaking this down…
1. ExtAPI.DataModel.Project.ModelThis is how 99% of my scripts or single-line commands begin. Essentially, this sequence accesses the model branch of the tree and allows us to dive into anything underneath it.

2. Analyses[0].Children[1]Most data in these tree objects are organized into lists, hence the need for indices. In this case, we are grabbing the first analysis from our tree (Static Structural A5) and then we are further diving into the second object under our static structural analysis (Pressure). Remember, since this is Python, index 0 is the first item in our list!

3. VisibleProperties[7]While there are multiple built in APIs for editing our Mechanical tree object, I stated that I was going to use the easiest to explain. VisibleProperties is a list referencing each field in the details window of our pressure object. Since magnitude is the 8th entry, I access it with index 7.

The list of visible properties generally is organized top to bottom as you would see in the details window, but sometimes the order is not as you would expect. It is always good to verify you have selected the correct field before proceeding! The command window is great for this. If we type in our command thus far and hit enter, it should return “Magnitude” …

4. InternalValue = 100.0Finally, we can access the value stored in the magnitude cell of our pressure details. If we called this command without the ‘= 100.0’ we could store the currently assigned pressure for further processing. In our case, however, we just want to overwrite the value. Note that Mechanical is expecting a float value to be assigned here. If we were to write ‘= 100’, Mechanical would detect an entry error and invalidate the pressure object.

It is also worth noting that we could have saved any intermediary object as a variable for operating on later. For instance, if I was writing a longer script that this was only a part of, I would have written this command as below. While either option is valid, this is probably the more “correct” way to go about it.

The Recording Feature in Ansys Mechanical Scripting
At this point, I would be remiss to not mention the record feature. Being able to record GUI actions is GREAT if you have no idea how to even begin your script. There are many times I’ve agonized over how to do something or what options are available… and then I remember that there is a button to start my script for me!
Two things to keep in mind with the record feature: 1. Not all GUI clicks are implemented for recording yet (the continued work on the APIs I mentioned earlier). 2. The record feature primarily accesses tree objects by their internal ID, which is often not easily visible/descriptive to the user. This is why I prefer the method of tree selection shown earlier, as it is clearer to others what/how you are selecting.
For this simple example, clicking the record button and changing the pressure magnitude in the GUI results in this script being generated.

Note that essentially everything about this recorded snippet is different than how I went about it… like I said before, there are multiple ways to approach this. Knowing the best way is up to your judgement and the task at hand.
A Second Example of Ansys Mechanical Scripting: Creating Probes
Ok, next example. Say, I’ve got a simulation where I need to probe a myriad of specific coordinate locations on the model, perhaps to compare with gauges from a physical test. The GUI workflow for this would be to create a coordinate system, edit its location, create a probe, and edit the probe to reference the CSYS. Not hard to do, but if we are talking about 100+ locations… not something I want to do by hand.
From what we’ve learned in the first example, a great way to start this script would be to record the GUI actions outlined above and then edit them to suit our purposes. Starting with the CSYS creation…

From this, we can see the necessary steps: create the CSYS, change its definition type, and define the coordinates of its new location. A bit hidden in this as well is that we need to select the coordinate system object in our tree to access the ‘AddCoordinateSystem’ method. Also note that this “Quantity” function has shown up again. If not directly modifying the internal value as in our first example, Mechanical expects you to pass it a value of type “Quantity”. This can be provided via the Quantity function, specifying both a magnitude and a unit.
Below are the changes I made to this recorded script to make it more suitable for our recursion purposes. I stored the current CSYS as a variable and parameterized the location definitions.
CS = ExtAPI.DataModel.Project.Model.CoordinateSystems.AddCoordinateSystem()
CS.OriginDefineBy = CoordinateSystemAlignmentType.Fixed
CS.OriginX = Quantity(X, "mm")
CS.OriginY = Quantity(Y, "mm")
CS.OriginZ = Quantity(Z, "mm")
Next, the probe creation and assignment…

This is very similar to the CSYS creation. Get the solution tree object, add a probe, change its location details. After my edits I arrived at the below.
ss = ExtAPI.DataModel.Project.Model.Analyses[0]
sol = ss.Solution
probe = sol.AddStressProbe()
probe.LocationMethod = LocationDefinitionMethod.CoordinateSystem
probe.CoordinateSystemSelection = CS
Ok, the last step before we put it all together is to decide what our data entry method is. I decided to write the X,Y,Z location of each probe to a csv file and then read that into our script. This is where the python magic comes in. Choose your favorite file reading method and then you are in business. For me, this looked like reading each text line in and extracting the relevant information.
with open(path) as file:
	line_list = file.readlines()

	for line in line_list:
		coords = line.strip().split(',')
		X = float(coords[0])
		Y = float(coords[1])
		Z = float(coords[2])
Now to add the file path, wrap this all into a nice workflow, and hit the run script button.
path = r'your file path here'
ss = ExtAPI.DataModel.Project.Model.Analyses[0]
sol = ss.Solution
with open(path) as file:
    line_list = file.readlines()

    for line in line_list:
        coords = line.strip().split(',')
	    X = float(coords[0])
	    Y = float(coords[1])
	    Z = float(coords[2])
	    CS = ExtAPI.DataModel.Project.Model.CoordinateSystems.AddCoordinateSystem()
	    CS.OriginDefineBy = CoordinateSystemAlignmentType.Fixed
	    CS.OriginX = Quantity(X, "mm")
	    CS.OriginY = Quantity(Y, "mm")
	    CS.OriginZ = Quantity(Z, "mm")
	    probe = sol.AddStressProbe()
	    probe.LocationMethod = LocationDefinitionMethod.CoordinateSystem
	    probe.CoordinateSystemSelection = CS
Now I can create CSYS based stress probes with the click of a button! Truly, ultimate power is mine.

This all is just the tip of the iceberg. Ansys Mechanical scripting is powerful because Python is powerful and Ansys has taken the time to expose much of what the mechanical GUI can do to the Python interface. Next time I hope to answer the original question and show how we can use Python along with Mechanical’s built in DOE engine to drive some non-typical parameterization.


